


The First Signs to Look For After a Storm Hits Your Roof
Homeowners are usually better served by focusing first on clear, immediate signs of damage, things like active leaks, water intrusion, or visible impact from debris, rather than trying to inspect every inch of the roof right away.
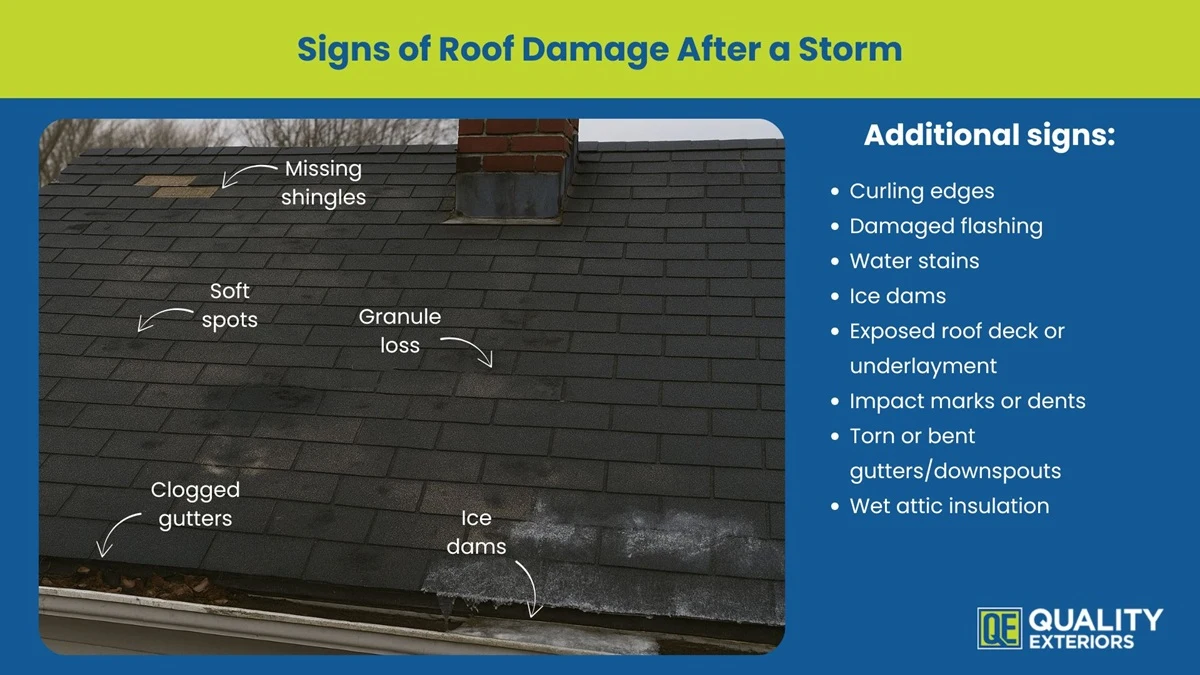
Spot obvious damage by checking your home from the ground or indoors. Focus on missing shingles, debris, gutter damage, and attic leaks, as storm restoration often covers the full exterior — including gutters, siding, and windows.
If your area was under a severe thunderstorm warning, a roof check is worth doing even if nothing looks dramatic at first glance. The National Weather Service uses that warning for storms capable of producing hail at least 1 inch in diameter or wind gusts above 58 mph, both of which are strong enough to damage roofing materials.
Why a Quick Roof Check Can Save You Trouble
Not all storm damage is obvious. A missing shingle or fallen branch gets attention right away, but smaller issues like lifted flashing, granule loss, or hairline cracks can sit unnoticed until they turn into leaks, stains, or mold. A careful inspection after a storm helps catch those problems early, while they are still easier and less expensive to fix.
- Hidden problems: Subtle damage can worsen over the next few months, leading to expensive roof repair costs and water damage inside your home.
- Insurance protection: Prompt documentation can make the claims process smoother.
- Safety concerns: Weak spots in the roof can worsen and put the home at risk.
- Cost savings: A small repair now is usually far less expensive than a larger repair later.
A quick inspection after severe weather can help you spot trouble early and avoid bigger problems in the following weeks.
Types of Storm Damage to Roofs
Before beginning your inspection, familiarize yourself with the most common types of roof damage caused by severe weather.
Hail Damage
Hail is one of the most common causes of roof damage in Tennessee. The size of the hail, the force of the wind, and the age of the shingles all affect the severity of the damage.
- Missing granules: Dark or shiny spots where asphalt shingles have lost their protective surface.
- Soft spots: Spongy areas that may point to damaged shingle backing.
- Exposed mat: Fiberglass or felt backing visible where shingles have been stripped bare.
- Impact dents: Round marks or bruises left by hail strikes.
- Lifted seals: Broken or loosened adhesive strips that leave shingles more exposed to wind.
What hail damage looks like on a roof rarely starts as a major-looking problem. Minor strikes can strip protection from the shingles and turn into bigger trouble later.
Wind Damage
Strong winds can tear into a roof immediately or create weak spots that worsen over time. Wind-driven rain often makes matters worse by introducing moisture problems. Watch for these common warning signs:
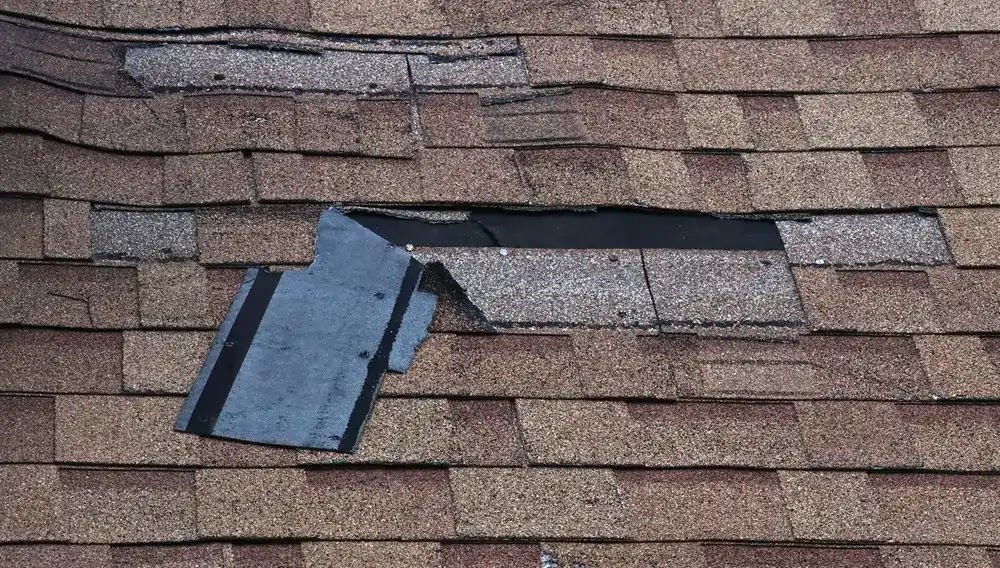
- Missing shingles: Entire pieces torn away, leaving roof decking uncovered.
- Lifted edges: Corners of shingles curled or raised from wind pressure.
- Creased materials: Shingles bent or folded, reducing their ability to keep water out.
- Torn sections: Damaged shingles left hanging or partially detached.
- Exposed underlayment: Tar paper or synthetic layers visible where shingles are gone.
Wind damage can be misleading since leaks may not show up right away. But once shingles are weakened, water can work its way in and cause hidden damage over time.
Water and Debris Damage
Heavy rain mixed with flying debris creates serious threats to a roof system. Pooling water, punctures, and soaked materials often result in both immediate and long-term problems. Here are the signs to look for:
- Debris impact: Tree limbs, branches, or other objects that have struck the roof’s surface during severe weather.
- Puncture holes: Openings in roofing materials from sharp debris, creating immediate water leaks.
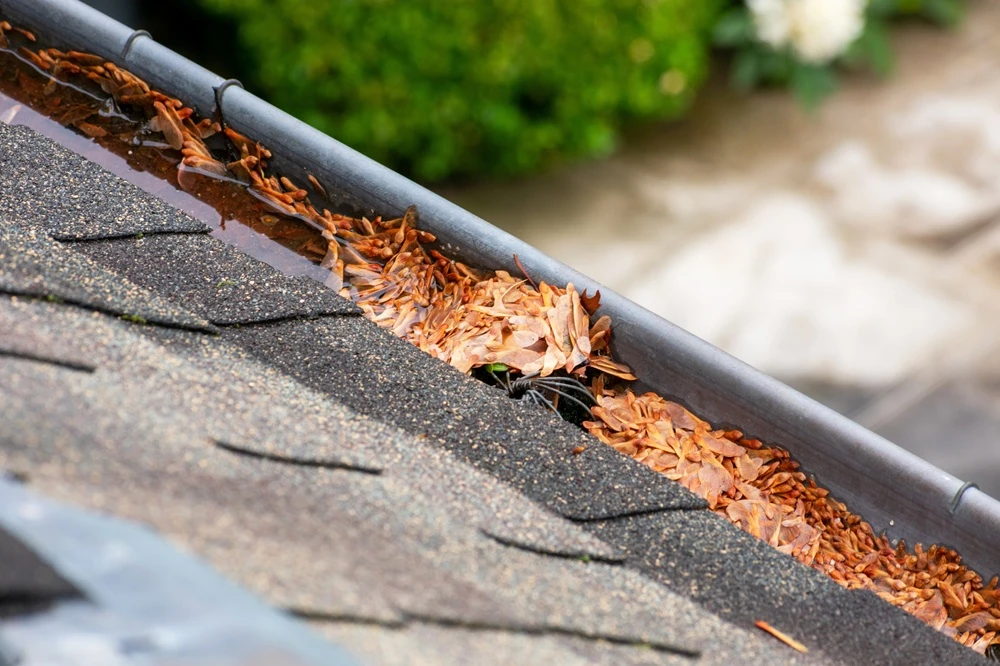
- Clogged drainage: Blocked gutters and downspouts, causing water backup and standing water issues.
- Ice dams: Frozen water accumulation that forces moisture under shingles during winter storms.
- Saturated materials: Water-logged insulation or decking visible from the attic space.
Debris damage often gives water a way in, while clogged drainage allows moisture to collect and threaten the home’s structure.
How to Check Your Roof After a Storm, Step by Step
You don’t need to climb onto the roof to spot the first signs of trouble. Start outside, move indoors, document what changed, then determine what needs to happen next.
1. Start From the Ground
Walk the perimeter of the house and view the roof from several angles. Focus on what looks out of place: missing shingles, lifted edges, sagging lines, branches on the roof, and gutters or downspouts that look bent, loose, or blocked. Binoculars can help you get a closer view. If something seems off, schedule a professional inspection rather than climbing up yourself.
2. Check the Parts That Fail First
Storm damage doesn’t stop at the shingles. Gutters and downspouts often show hail dents early. Flashing around vents, chimneys, and skylights can pull loose or bend just enough to let water in. Siding, window trim, and screens may also show debris impact that helps explain what happened above.
3. See What the House Shows You Inside
Head to the attic and the rooms closest to the roof. Water stains, damp insulation, daylight through the decking, peeling paint, warped drywall, and moisture around light fixtures can all point to roof damage. Some problems show up hours later, so you’ll want to check again after the next rain.
4. Photograph Before Cleanup Starts
A strong insurance claim starts with clear, organized documentation. Take wide shots of each roof slope and exterior side of the house, then add close-ups of damaged areas. Capture the full roofline, damaged areas, debris, dents, attic stains, and any interior leaks. Write down the storm date, where you notice damage, and anything that changed after the weather passed.
5. Call Your Insurance Company
Once you have signs of damage, report it promptly. Share the basic details, ask what documentation they want, and find out what should happen before repairs begin. The roof insurance claim process is usually smoother when the damage is documented early, and the inspection trail is clear.
6. Bring in a Local Roofer
A local contractor can confirm what the storm actually damaged, spot issues that are easy to miss from the ground, and help you sort out whether repair or replacement is optimal. Choose a roofer with a real local presence, clear documentation, and experience with storm-related inspections and insurance work.
#cta_start
Worried Your Roof Took Storm Damage?
Hail, strong winds, and flying debris can leave behind damage that’s easy to overlook at first. Quality Exteriors inspects roofs across Middle Tennessee and helps homeowners understand what’s going on and decide on the next steps with confidence.
#cta_end
Steps to Prevent Additional Storm Damage
Once you’ve confirmed that your roof has storm damage, taking quick precautions can stop small issues from turning into major repairs. Acting right away helps protect the inside of your home and reduces repair costs. Keep these steps in mind:
- Emergency covering: Place tarps over exposed areas, but only if it can be done safely from inside the attic or with proper ladder precautions.
- Clear drainage: Remove leaves and branches from gutters and downspouts to keep water flowing away from the roof.
- Interior protection: Use buckets or containers to collect leaks and move valuables away from affected areas.
- Avoid risky repairs: Stay off the roof and avoid temporary fixes that could make the damage worse.
Remember that temporary fixes are just that — temporary. Professional repairs ensure long-term protection and maintain your warranty coverage.
How to Find a Trusted Roofer After a Storm
Once you’ve documented the damage and contacted your insurer, choose your contractor carefully. After major storms, homeowners are more exposed to roofing scams, rushed estimates, and out-of-town crews chasing quick jobs. Look for a roofer with a real local presence, proper insurance, a written scope of work, and enough patience to let you review the estimate before signing.
A good post-storm inspection should leave you with clear documentation, a clear repair scope, and enough information to decide whether the roof needs a repair or a full replacement.
Protecting Your Home from Future Storm Damage
Proactive maintenance and smart upgrades reduce your vulnerability to severe weather events. The best time to replace roof systems is before damage occurs. Consider these protective measures:
- Regular inspections: Schedule yearly professional roof checks to catch problems early.
- Gutter care: Keep gutters clean and correctly aligned to prevent backups and ice dams.
- Tree trimming: Cut back branches that could break and fall on the roof during wind or ice storms.
- Material upgrades: Consider impact-resistant shingles and metal roofing options for enhanced storm protection.
- Ventilation improvements: Proper attic ventilation prevents ice dams and extends roofing materials’ lifespan.
Preventive measures cost less than storm repairs and allow problems to be fixed during calm weather, when roofing work is simpler and more affordable.


